- Published on
- Updated on
Recover Deleted Photos from SD Card Free: Step-by-Step Recuva Guide
- Authors
One of the common problems among Android and iOS users is losing photos from an SD card. Reliable methods exist to restore deleted photos from memory cards in such cases. Unlike internal storage, an SD card can be connected to a computer, which simplifies the recovery process since you can use recovery software without restrictions.
In this guide, we'll explore Recuva, a tool we frequently mention, and provide a step-by-step tutorial on using its features for photo recovery. This guide also applies to other types of files.
Table of Contents
- What Do I Need to Restore Files?
- When Are Photos Lost from an SD Card?
- Step by step Guide
- 1. Remove the SD Card from Your Device
- 2. Install Recovery Software
- 3. Select Media Formats
- 4. Connect the SD Card to Your Computer
- 5. Enable the Deep Scan Feature
- 6. Start the SD Card Scan
- 7. Sort Photos and Keep the Ones You Need
- 8. Save Selected Photos to the Disk
- What if Recuva Fails to Recover Deleted Photos from the Memory Card?
- FAQ
What Do I Need to Restore Files?
You don’t need anything extraordinary to restore files at home:
- A computer or laptop for installing the software
- A card reader to connect the memory card
- The memory card from which files were deleted
- Patience and accuracy for optimal results
When Are Photos Lost from an SD Card?
Photos can be lost from an SD card due to various reasons, including:
- Accidental deletion
- Transferring files between the memory card and internal memory
- Errors following incorrect unmounting
- Corrupted files on the SD card
- Memory card format errors
Step by step Guide
1. Remove the SD Card from Your Device
Take out the SD card from your device (smartphone, tablet, digital camera, or any other device where it was used) to prevent accidental overwriting of data.
2. Install Recovery Software
Free card recovery software can be as effective as many paid options. Starting with a free solution like Recuva is a great first step, as it may prove very helpful.
We’ll be using Recuva. This tool can restore images and supports a wide range of photo formats, including JPG, PNG, RAW, and GIF. Currently, Recuva is available for Windows only, without an Android version.
Install Recuva on a partition of your computer that is different from where the SD card data was deleted to avoid overwriting the lost files.
3. Select Media Formats
- When you start, you’ll see the "Welcome to Recuva Wizard" screen. This step-by-step recovery guide is designed to assist beginners: simply answer a few basic questions to proceed.
- Press Next. You’ll then be asked to select the file types you want to recover. Check the box next to the image file formats. Although skipping format selection won’t affect the scan speed, it’s recommended to filter formats here to avoid manually sorting through hundreds of restored photos.
- Choose Pictures and click Next.
4. Connect the SD Card to Your Computer
- Insert the SD card into a card reader and connect it to your computer or laptop. For instructions, click [here].
- In the "File location" section, specify where the files were deleted from.
Tip: To save time, you can limit the scan to specific directories. If you’re unsure, you can select the root directory to increase the chances of recovering all deleted files.
Where Are Photos Stored on My Device?
Photos are usually stored in the DCIM folder, which is the standard location for images on devices with SD card support. This folder contains photos taken with the camera, downloaded images, videos, and more. For additional details, see here.
5. Enable the Deep Scan Feature
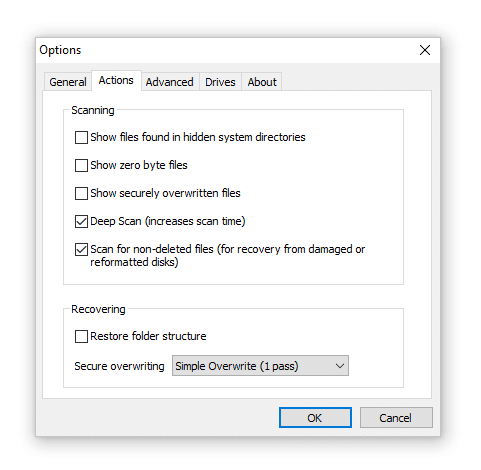
The Deep Scan feature allows Recuva to locate files that a basic scan might miss. Although it may not find every file, it significantly improves recovery chances.
To enable Deep Scan, go to the main menu in Recuva: Options → Actions → Deep Scan.

6. Start the SD Card Scan
- Press Start to begin the scan.
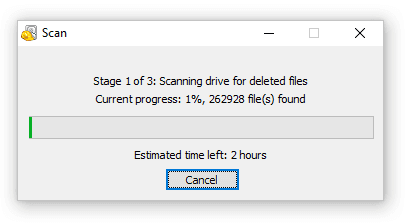
- Allow the scanner to complete its check on the selected folder on the SD card. This process can take anywhere from a few minutes to over an hour, depending on the card's size.

7. Sort Photos and Keep the Ones You Need
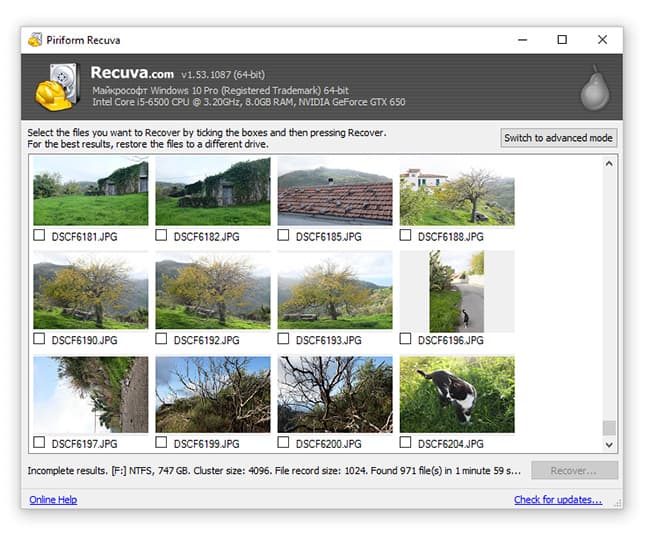
- Deleted photos recovered by Recuva are displayed as thumbnails, allowing you to preview and quickly identify the photos you want to save.
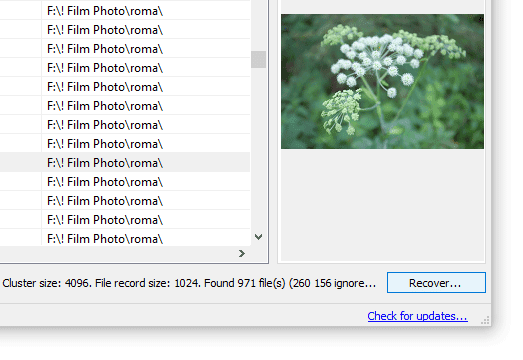
- If needed, you can switch to Advanced Mode for more detailed information about selected files.
- Recuva uses color coding to indicate the recovery likelihood:
- Red for minimal likelihood
- Yellow for moderate likelihood
- Green for high likelihood
- In the Info section, you can view details like Filename, Path, Last Modification Time, and more, which may be helpful. The Preview feature shows the image status, indicating whether photos are intact or damaged.

Tip: If Recuva doesn't locate any files, try adding more formats in the Recuva Wizard settings or in Advanced Mode. Including formats like RAW, .CR2, .NEF, or .ARW can help increase your chances of retrieving photos.
8. Save Selected Photos to the Disk
Once you've selected the photos you want to recover, click Recover.

For the best results, avoid saving the restored data on the disk where it was deleted, especially if it’s an HDD. In this case, try not to save photos back to the SD card, as doing so could reduce the recovery chances.
What if Recuva Fails to Recover Deleted Photos from the Memory Card?
If you followed the tutorial and correctly set up Recuva but are not satisfied with the results, consider these alternatives:
- Check out this page for additional resources on data recovery for mobile devices and personal computers.
- Try other recovery software options, such as free tools like PhotoRec or DiskDigger.
- Explore answers from other users and our responses below for more insights and solutions.
FAQ
Q: My Huawei Y5 glitched, turned off by itself, and nearly all my Camera photos disappeared. Scanning the SD card shows more free storage, meaning the photos are gone. Were they removed permanently?
A: If you didn’t delete the photos yourself, there may have been an error on your SD card, often due to bad sectors. Although Windows may suggest formatting, it’s best to decline. Instead, try our tutorial on fixing errors on memory cards. If this doesn’t resolve the issue, open Recuva, specify the folder where the files were stored, and follow the recovery steps outlined in this guide.
Q: I accidentally formatted my SD card while trying to transfer photos from my camera to the computer. How can I retrieve the deleted photos? I didn’t back up many of them elsewhere.
A: Since you performed a quick format, Recuva may still help, provided the card hasn’t been overwritten. Refer to our guide on recovering files from a formatted SD card with Recuva.
Q: All my files show as free space, are dated to 1980, and don’t open in Android Gallery. They’re also invisible on my laptop. Any suggestions?
A: This could be due to corrupt EXIF data or memory card reading errors. Here’s what we suggest:
- Create a backup of the files on your computer or Google Photos.
- Format your memory card in Full Format mode to repair reading errors. You can use SDFormatter for this.
Q: I was transferring photos from internal storage to an SD card, but they were all deleted during the process. I used a utility to recover them, but now they appear blurred. Can this be fixed?
A: It sounds like only the thumbnails were recovered. Try scanning the folder on your SD card again, this time using Deep Scan mode.
Q: I copied files from my phone’s internal storage to the SD card using a USB cable, but they didn’t appear on the SD card and seem to have vanished. What should I do?
A: In this case, try using the DiskDigger utility for Android, which is helpful for photo recovery from memory cards.
Result: 0, total votes: 0

I'm Vladimir, your guide in the expansive world of technology journalism, with a special focus on GPS technologies and mapping. My journey in this field extends over twenty fruitful years, fueled by a profound passion for technology and an insatiable curiosity to explore its frontiers.