- Published on
- Updated on
How to Repair Bad Sectors on a Hard Drive: 3 Effective Methods
- Authors
In this tutorial, I'll show you three easy ways to find and fix bad sectors on your hard disk. You can use both the free features of the built-in CHKDSK utility and paid programs like HDD Regenerator and VictoriaHDD.
These tools allow you to safely perform hard disk diagnostics, detect errors (including bad blocks), and fix them if necessary.
3 Proven Ways to Fix Bad Sectors on an HDD
Using HDD Regenerator
HDD Regenerator works on both the software and hardware levels of a storage device, helping to significantly extend your hard disk drive's lifespan with minimal loss of storage capacity.
Loading...
To repair bad blocks, follow these steps:
- Run HDD Regenerator.
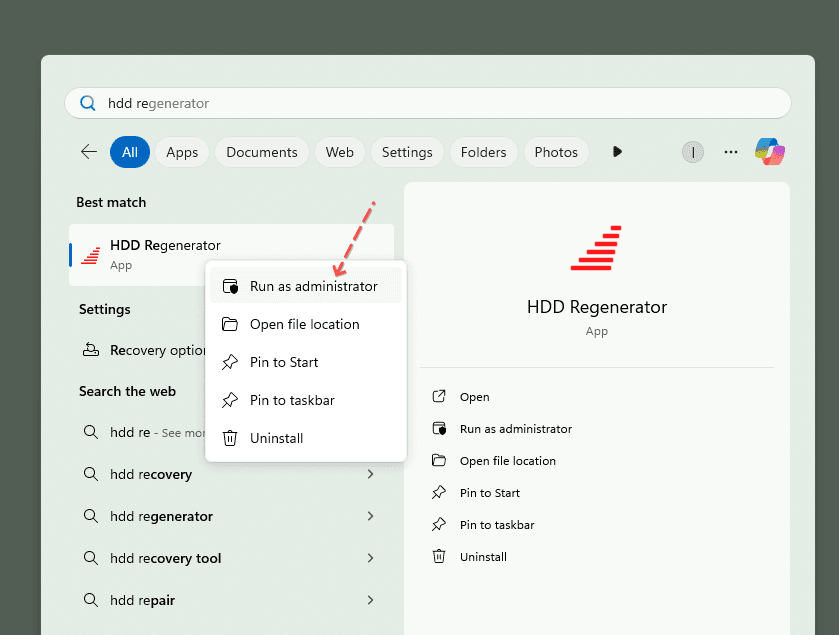
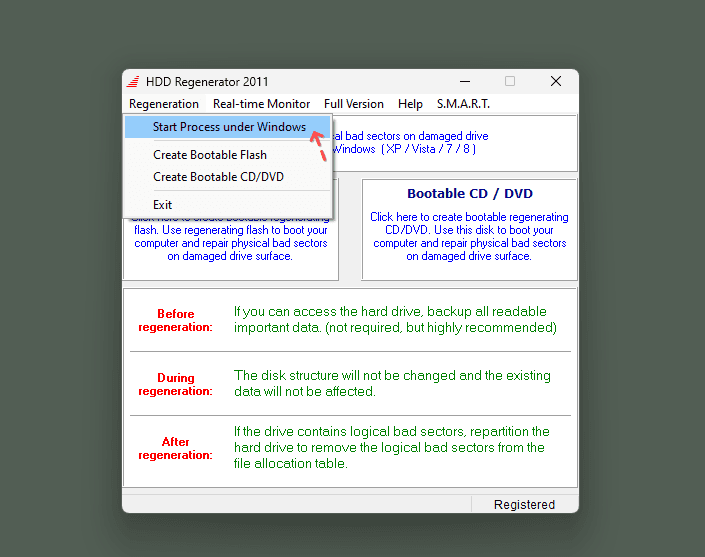
- In the "Regeneration" tab, select "Start process under Windows."
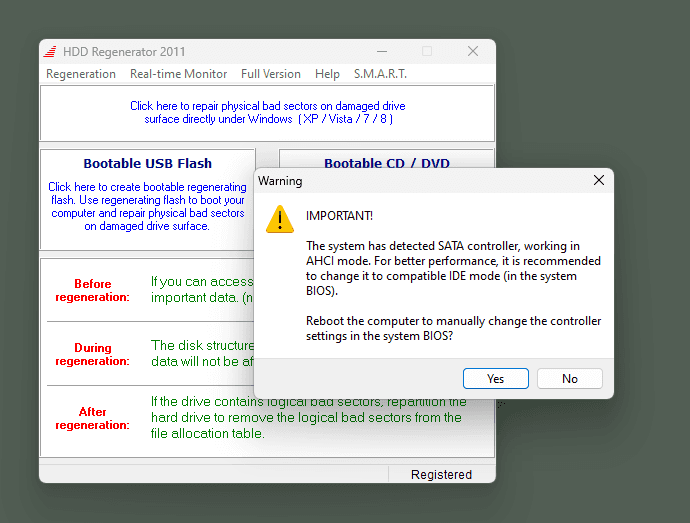
- Close all running applications to ensure the utility can access all HDD sectors.
(Optionally, you can switch to IDE mode via BIOS. To do this, reboot the computer and change the controller settings.)
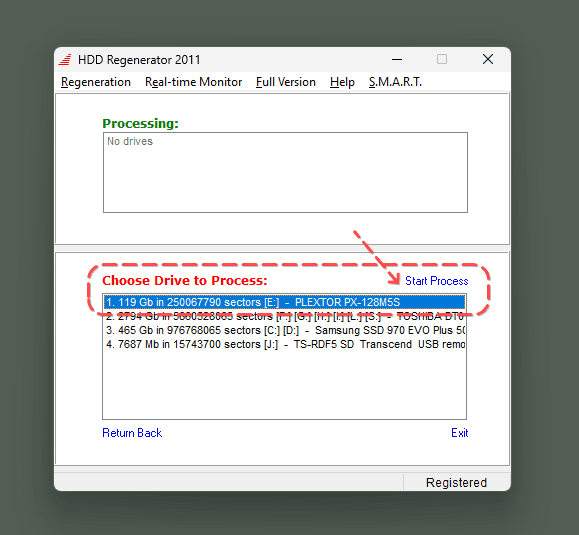
- On the next screen, choose the drive to fix bad sectors. Then, click on the "Start Process" button.
If an access error occurs, click "Cancel."
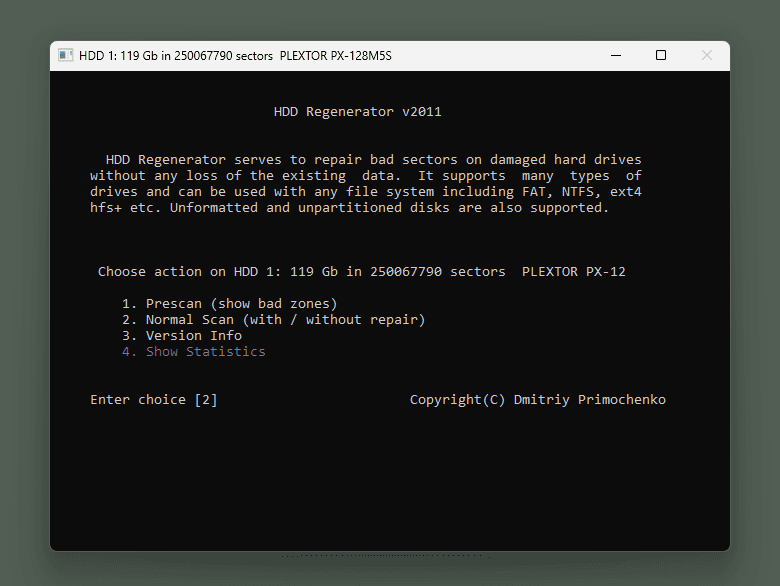
In the console window, choose the second mode (Normal scan) by entering "2" and pressing "Enter."
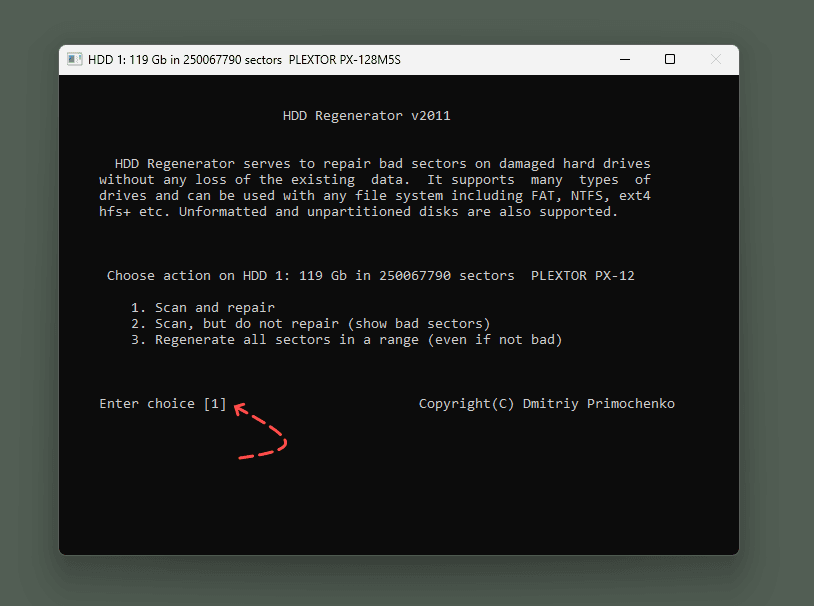
- On the next step, to scan and repair bad sectors, press the [1] button.
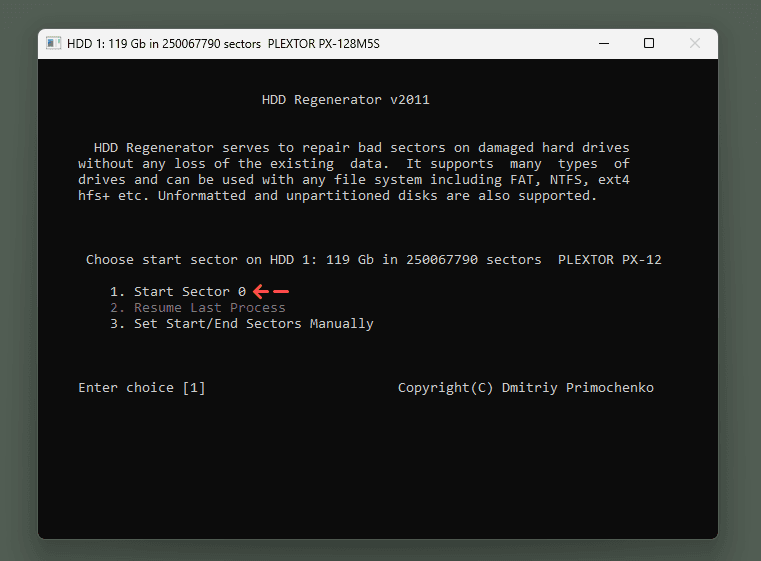
- Choose start sector 0 (option 1). This will initiate a check from scratch, without changing the proposed start value.
- The bad block search process will begin, so you need to wait a few minutes (3-10). Do not use your computer during this time.
During the process, you can monitor the progress and view important information about your HDD or SSD, such as bad sectors found and/or recovered.
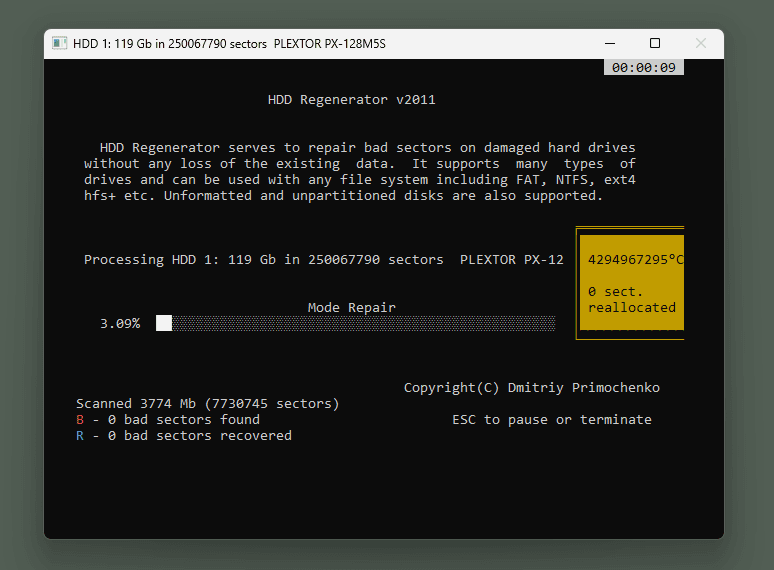
To pause or terminate the process, use the ESC button, though it’s generally not recommended to interrupt the process.
- Once the scan is complete, HDD Regenerator will display a report highlighting two critical points: Bad sectors found and Bad sectors recovered.
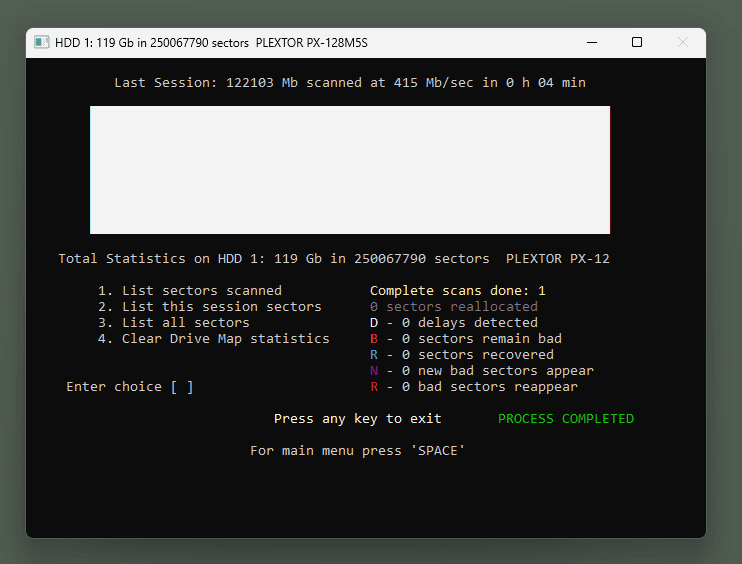
- To repair bad sectors, repeat the steps above, but this time select "Check and recover bad blocks." It's advisable to perform this process in Windows Safe Mode.
Repairing Bad Blocks with VictoriaHDD
VictoriaHDD works similarly to HDD Regenerator but comes with more features. However, its interface might be a bit overwhelming for beginners.
First Method: Quick Diagnostics with Victoria HDD
For a fast assessment, you can use the GUI to perform a quick scan of the hard disk surface. Any bad blocks detected will be marked with red markers or an "x" icon. However, note that the scanner operates only in read mode during this process.
Open the Victoria HDD program.
Go to the "Drive Info" section.
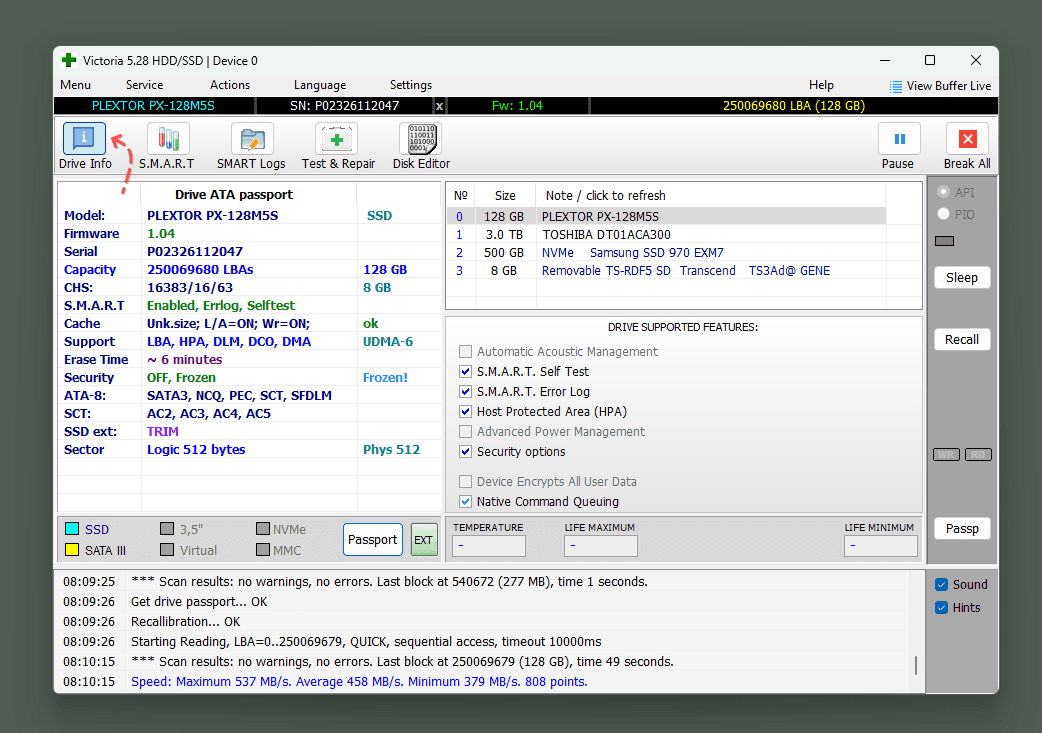
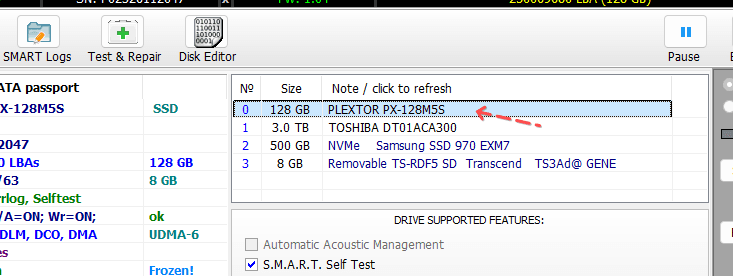
- Select your hard disk from the list.
- Go to the "Test & Repair" section.
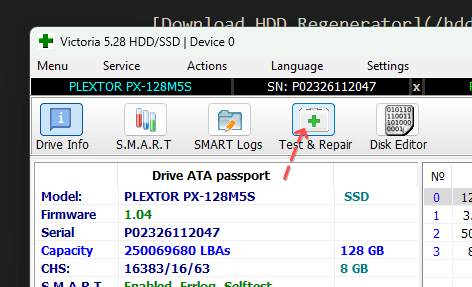
- Click the "Quick" button to initiate quick diagnostics.
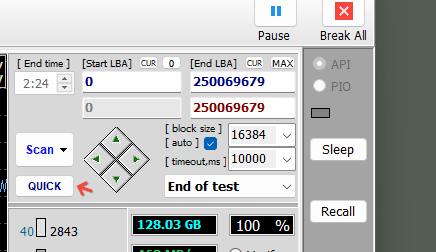
After the scan is complete, you'll see a graph of the scan results and a map indicating any bad sectors.
Second Method: DOS mode
The first hurdle you'll encounter is creating a bootable flash drive with "Victoria," which you can easily do using WinSetupFromUSB.
- Boot from the flash drive using the VictoriaHDD utility.
To boot from a flash drive:
In the "Main" section of BIOS, select "SATA Mode" and set it to "IDE."
Save the changes and restart your computer (in most BIOS versions, press F10 and confirm your choice).
Once booted, select a port by pressing "P" on the keyboard, then click "Ext." Choose PCI ATA / SATA for SATA or IDE for a hard drive with the corresponding connection interface.
Press "F4" to activate BB mode: Erase 256 sectors.
Note: When a bad block is detected, the program attempts to recover it, but this process will erase all the information stored on that sector. Make sure to back up all your files before proceeding!
- Repeat the process in BB mode: Classic REMAP. Sectors that can't be recovered will be moved to the backup area, slightly improving your HDD's performance.
After using VictoriaHDD, boot into Windows and go to "Properties – Tools – Check – Scan drive" in the local drive properties.
Using Windows Built-in Utility CHKDSK
CHKDSK offers a straightforward way to fix disk errors and identify bad sectors, making it ideal for those who prefer a simple process. To scan and recover your hard drive:
- Open the Windows Command Prompt as an Administrator.
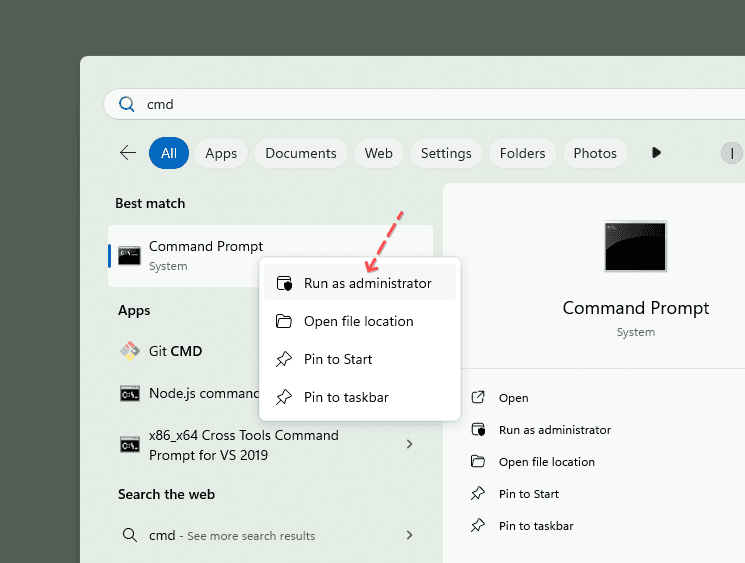
- Enter the command:
CHKDSK [disk path, for example, L:\] /F /R.
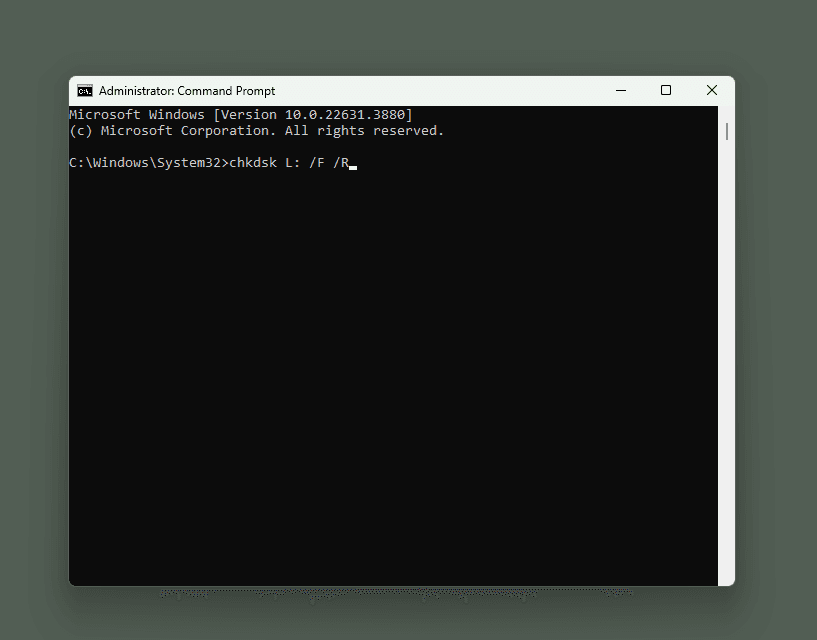
Press "Enter" and let the utility scan your HDD for errors.
During stage 4, CHKDSK will check for bad clusters in user file data. This step may take anywhere from 10 minutes to an hour, so be patient.
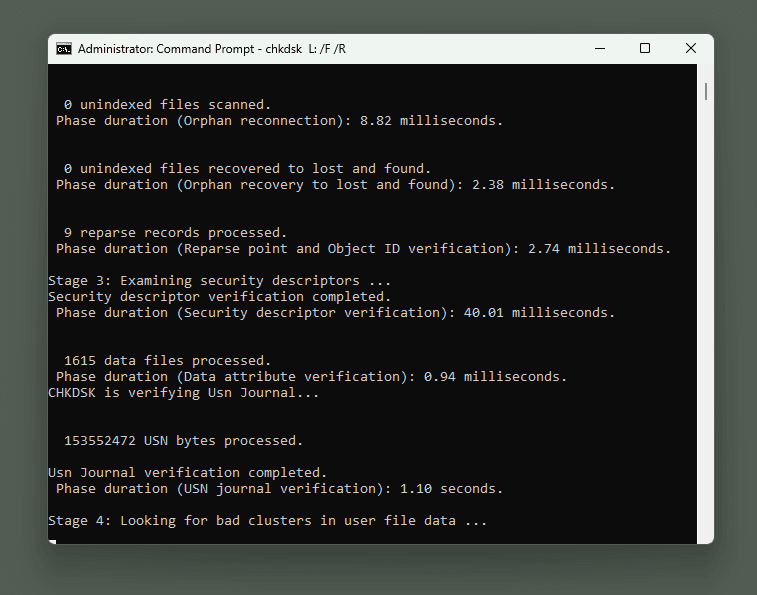
- Once the process is complete, restart your computer.
Note: Unlike HDD Regenerator and VictoriaHDD, CHKDSK cannot repair bad sectors. It can only detect and mark them as faulty, preventing the system from attempting to read or write data to these sectors. Running CHKDSK regularly can help minimize the impact of bad sectors on your hard drive.
FAQ
What Are Bad Blocks?
An unreliable or unreadable sector of an HDD is usually called a bad sector or a bad block. The more bad blocks you have, the worse and slower your storage device operates. When there are more bad sectors than the amount allowed by the manufacturer, a hard drive may stop working. You can prevent damage by regularly "treating" your computer with specialized software.
Where Do Bad Blocks Come From?
You can find bad sectors even on new, unused hard drives. These sectors may not necessarily be unavailable for reading/writing information by default. Sometimes potential bad sectors are labeled as "non-operational." This labeling prevents damage to user data recorded on "unstable" sectors, as managed by the manufacturer and the SMART software module.
Conclusion
While no program can fix mechanical damage, and logical failures can't always be repaired, these tools can help prolong the operation time of your hard disk. Consider them as preventive measures, rather than permanent solutions, to keep your HDD in good condition.
Result: 0, total votes: 0

I'm Vladimir, your guide in the expansive world of technology journalism, with a special focus on GPS technologies and mapping. My journey in this field extends over twenty fruitful years, fueled by a profound passion for technology and an insatiable curiosity to explore its frontiers.